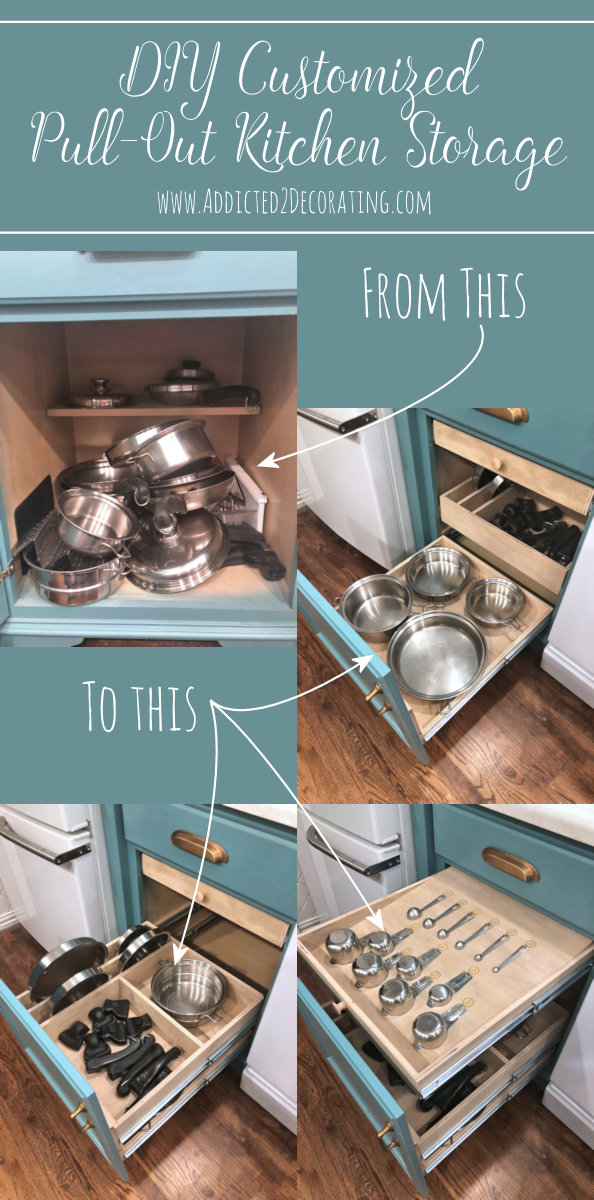
I’m in full-blown group mode proper now. After solidifying my group plan for my kitchen, I jumped proper in and began implementing my plan by turning a plain field of a cupboard right into a personalized powerhouse of pots and pans group with three DIY pull-out cabinets made particularly for my cookware, and customised for the way in which that I take advantage of my kitchen.
That is embarrassing, however let me present you ways this cupboard began out…
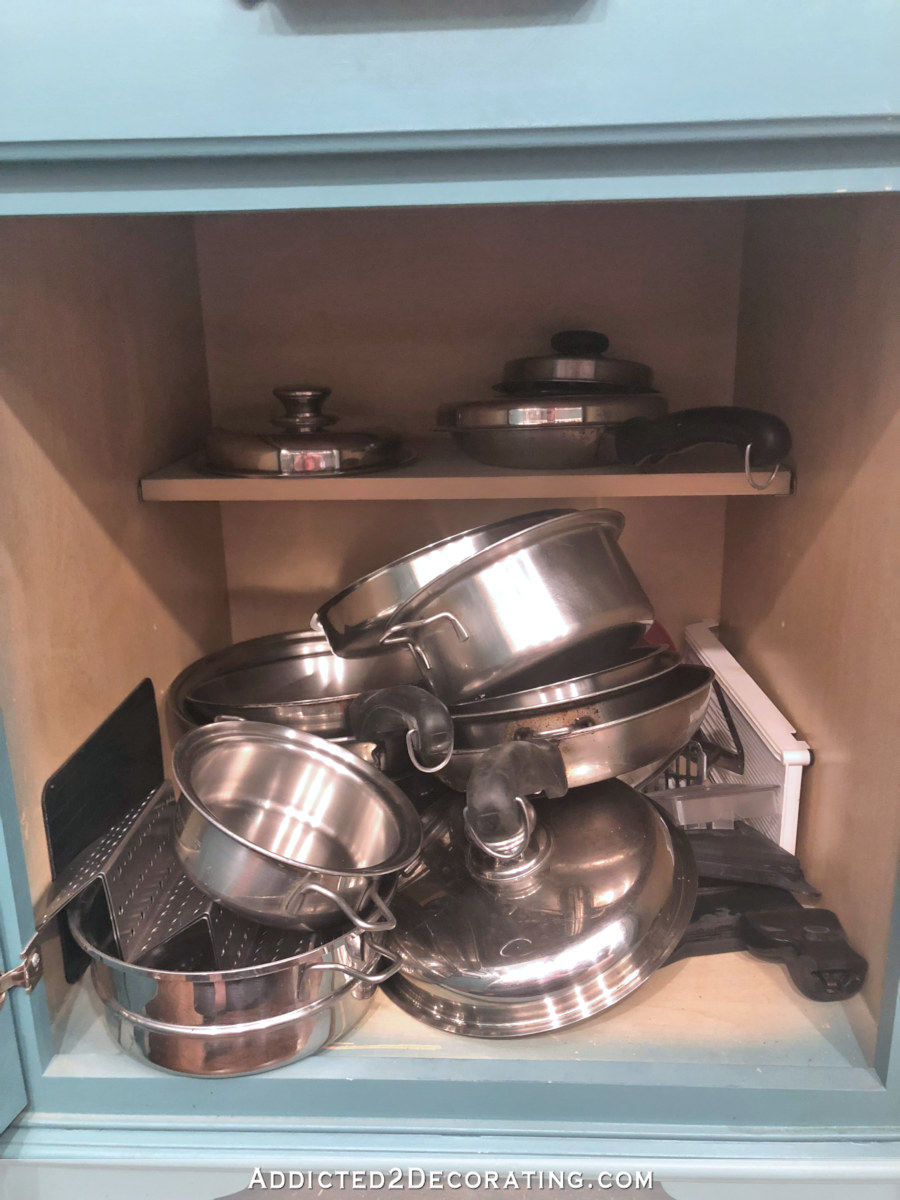
I’ve stated it earlier than, and I’ll say it once more. Group simply isn’t my factor, and if it isn’t extremely straightforward to get and maintain one thing organized, then I most likely gained’t do it in any respect. That’s why my cookware cupboard all the time ended up wanting like that. I may straighten up the stacks, and per week later it might look identical to that once more, so why hassle?
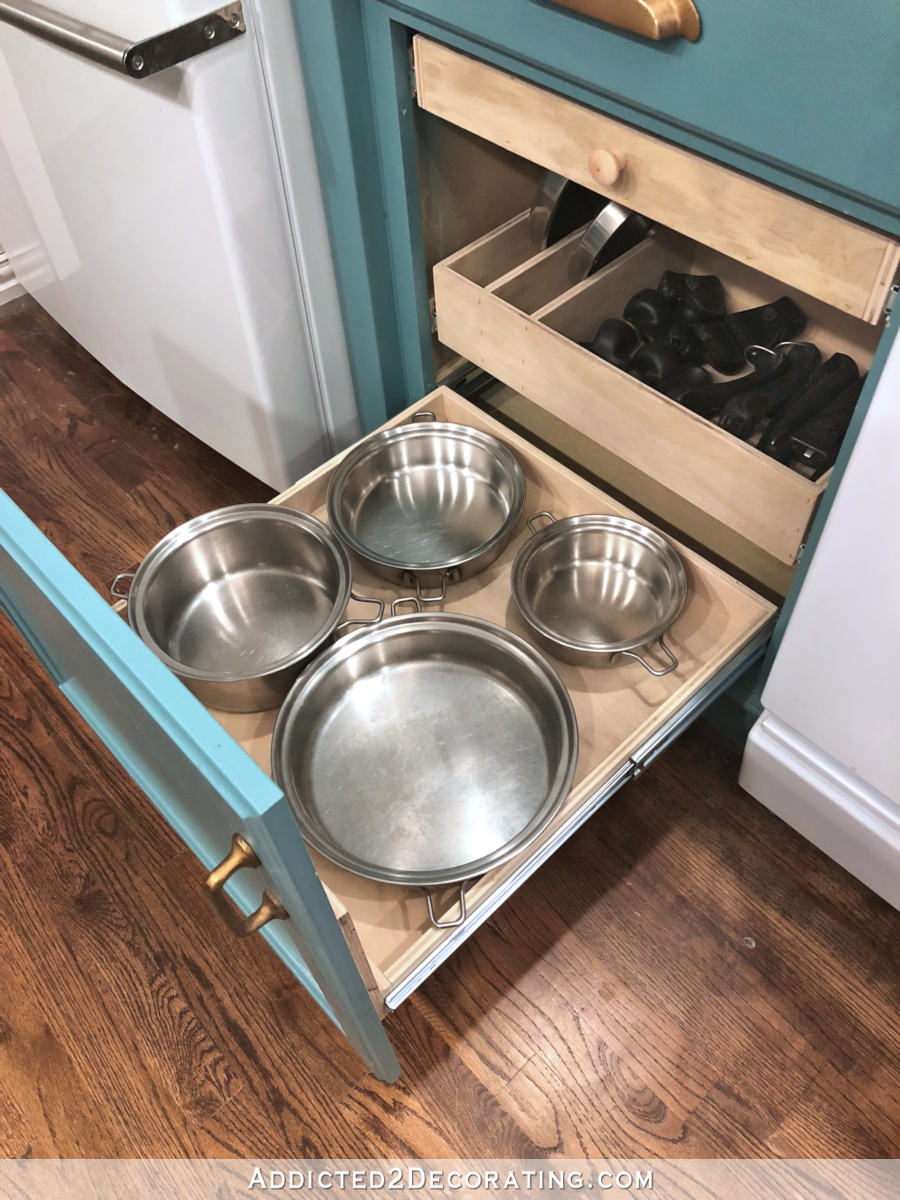
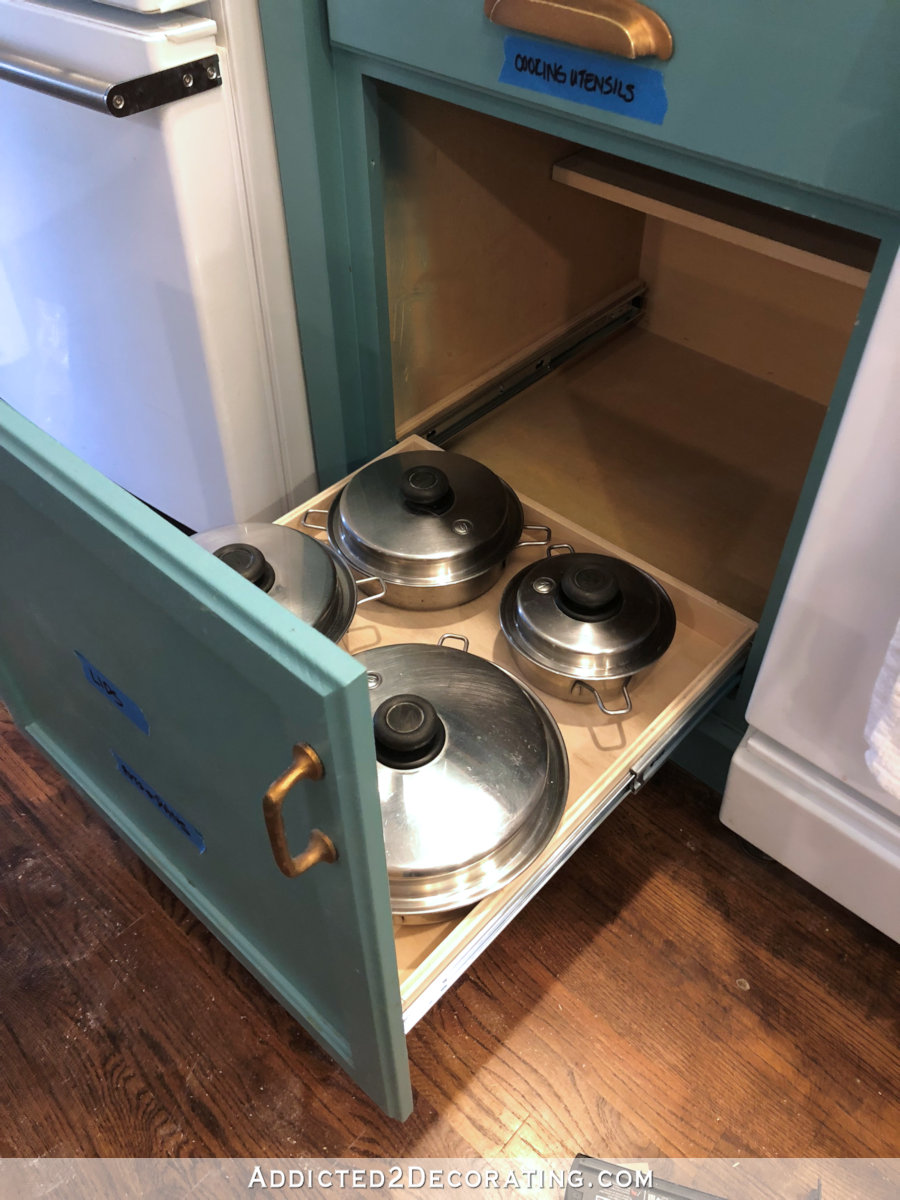
Effectively, sufficient was sufficient. After eradicating the door, creating a few personalized DIY pull-out cabinets for pots and pans group, and attaching the door to the entrance of the decrease pull-out shelf, I now have a totally organized cookware cupboard.
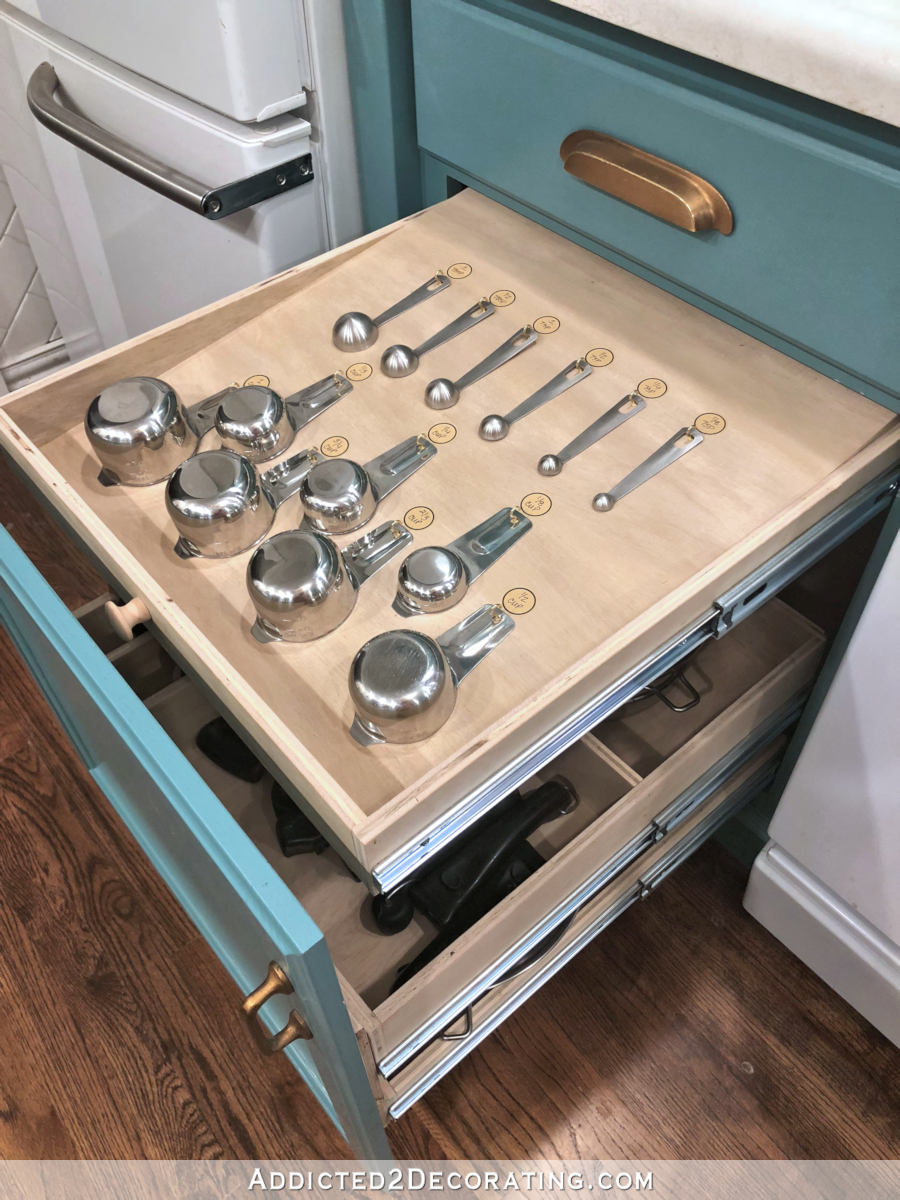
Right here’s the decrease shelf, which now homes my 4 most-used pots and pans (i.e., those I take advantage of just about each single day)…
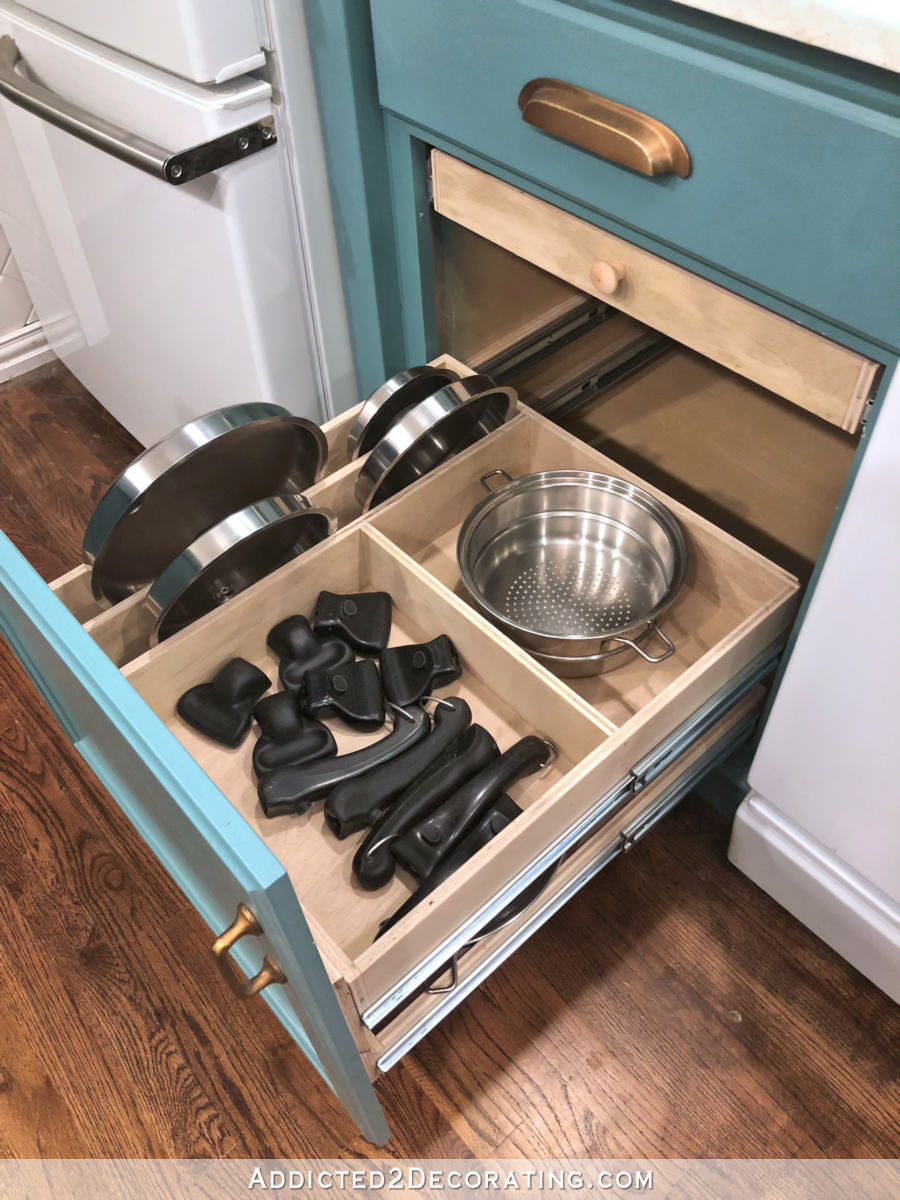
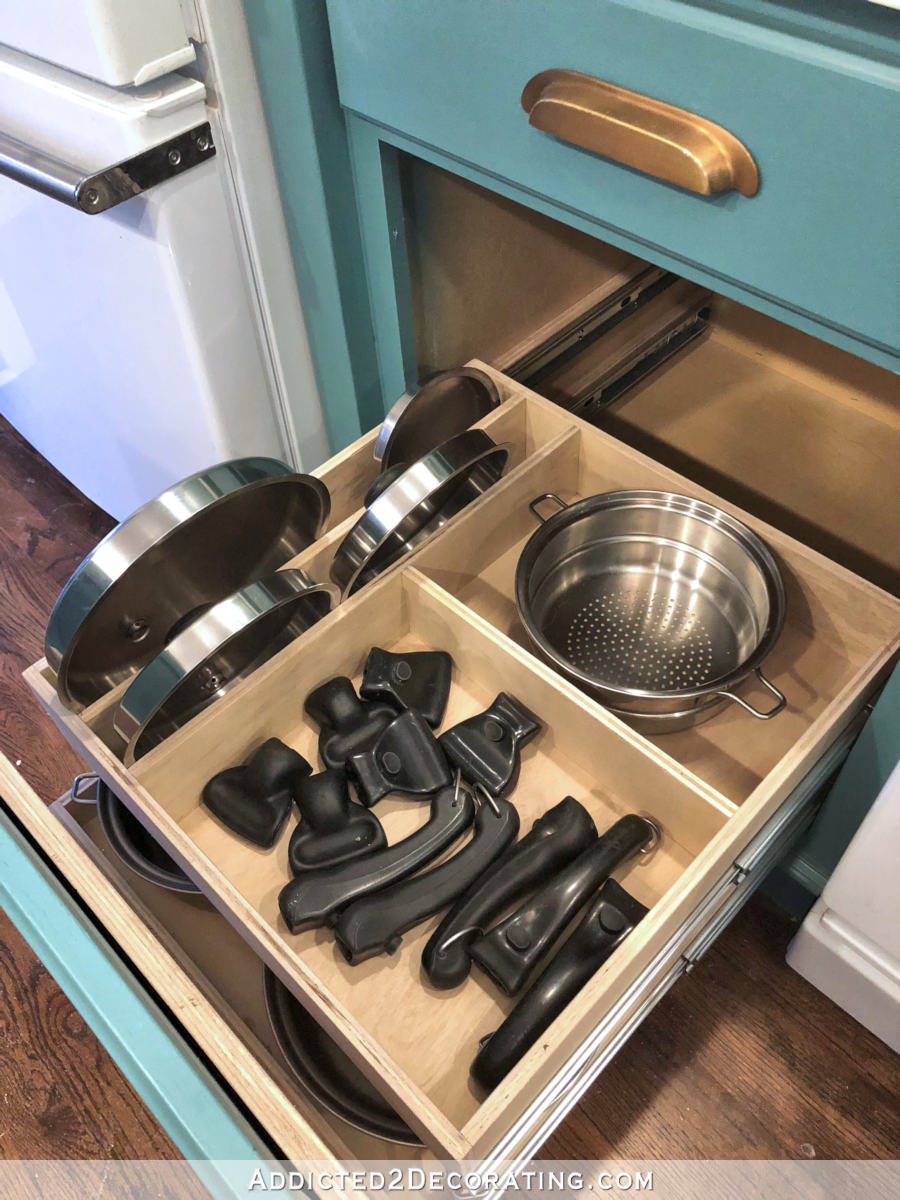
And on the center shelf, I created DIY pull-out shelf with custom-sized slots to carry the 4 lids that particularly match these 4 items of cookware. Then I created a bit for the handles. (I take advantage of Saladmaster cookware, which has detachable and interchangeable handles.) After which I had sufficient room on that shelf to create a bit for the steamer insert.
And after I had every part in that cupboard that I completely wanted and needed in there, I had a little bit room left on the high, so I created yet one more DIY pull-out shelf that’s personalized particularly to carry my measuring cups and spoons.
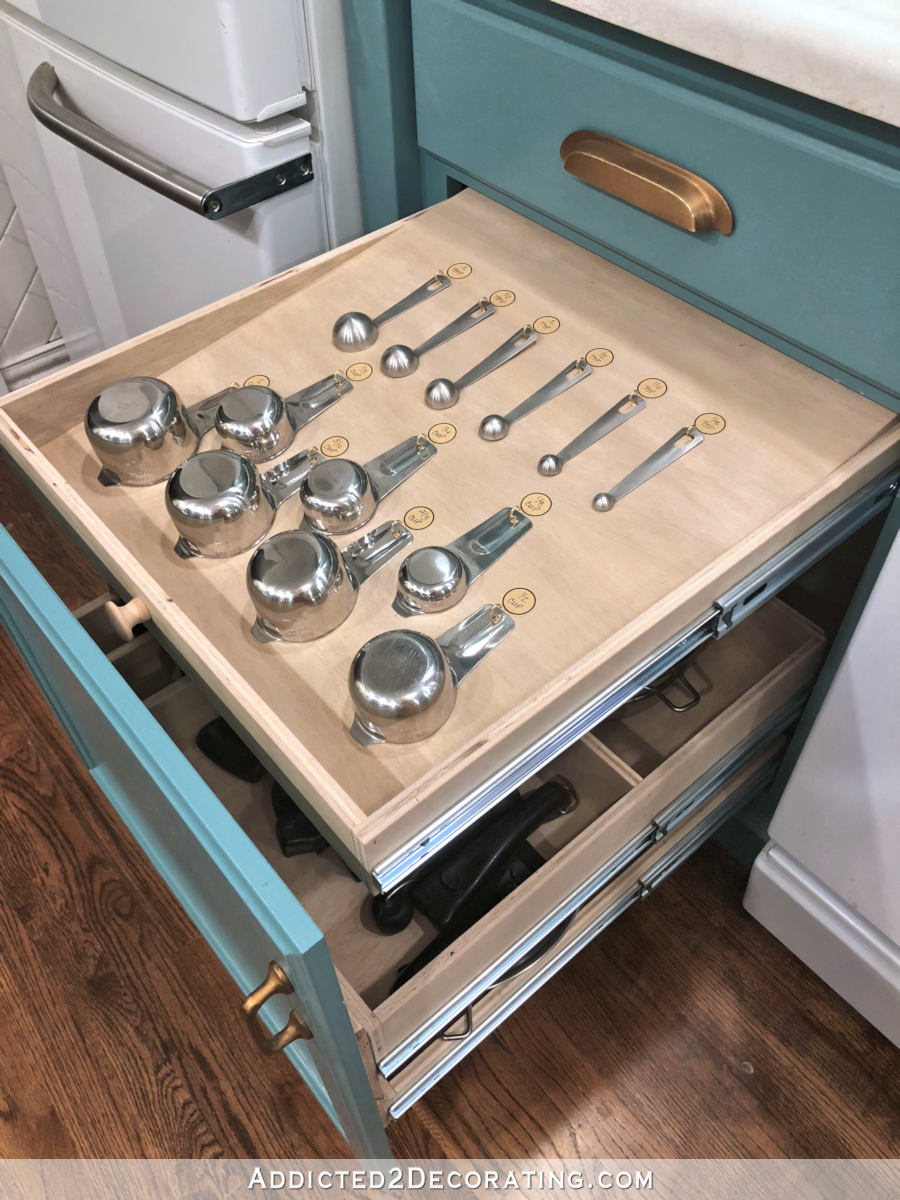
I do know that most likely appears ridiculous to some, however it’s excellent for me. I’ve stated earlier than that I actually dislike cooking, and something I can do to make the method simpler is a bonus. And one factor that appears to frustrate me nearly each single time I prepare dinner is digging via stacks of measuring cups and spoons to seek out the one I want. This manner, they’re all there, they’re NOT stacked on one another, they’re straightforward to seize, and I can simply see if one is lacking (and doubtless sitting soiled within the sink).
And that, to me, is the very best factor about beginning out with plain, open cupboards and customizing the pull-outs your self. You possibly can customise them to suit your particular cookware and your particular likes, dislikes, wants, processes, and so forth. I’m having a lot enjoyable pondering via precisely how I take advantage of my kitchen, precisely the place I need to retailer and entry varied issues, and what issues I can remedy with very customized-to-me pull-outs.
So now let me present you the method…
The right way to construct DIY pull-out cabinets for pots and pans group:
1. Set up the drawer slides within the cupboard.
I’ve talked about a number of instances that after I construct drawers or pull-out cabinets, I all the time set up the drawer slides first. Then I pull them out barely and measure the space between them to get the completed drawer width. Putting in the drawer slides earlier than I even start constructing the drawer takes all the guesswork out of the method.
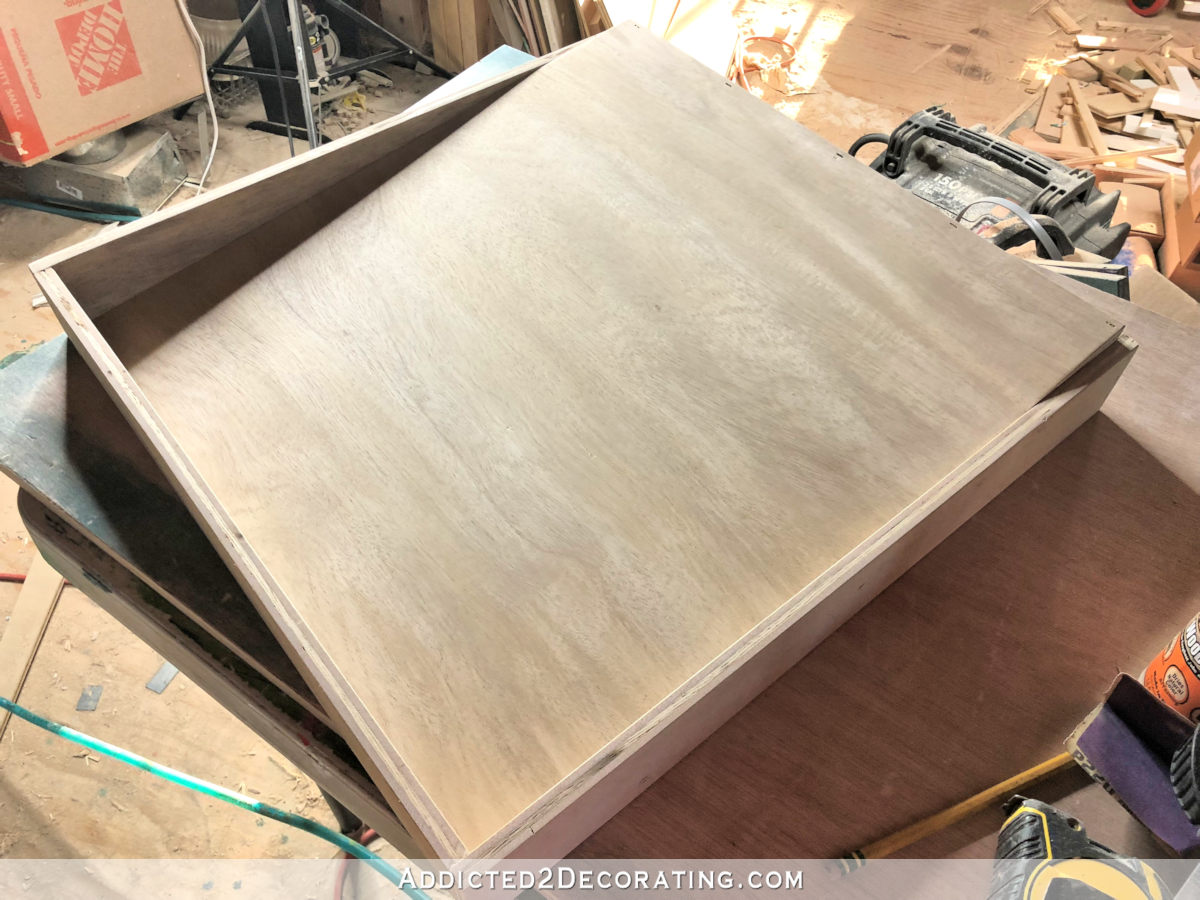
2. Reduce plywood for the underside of the shelf.
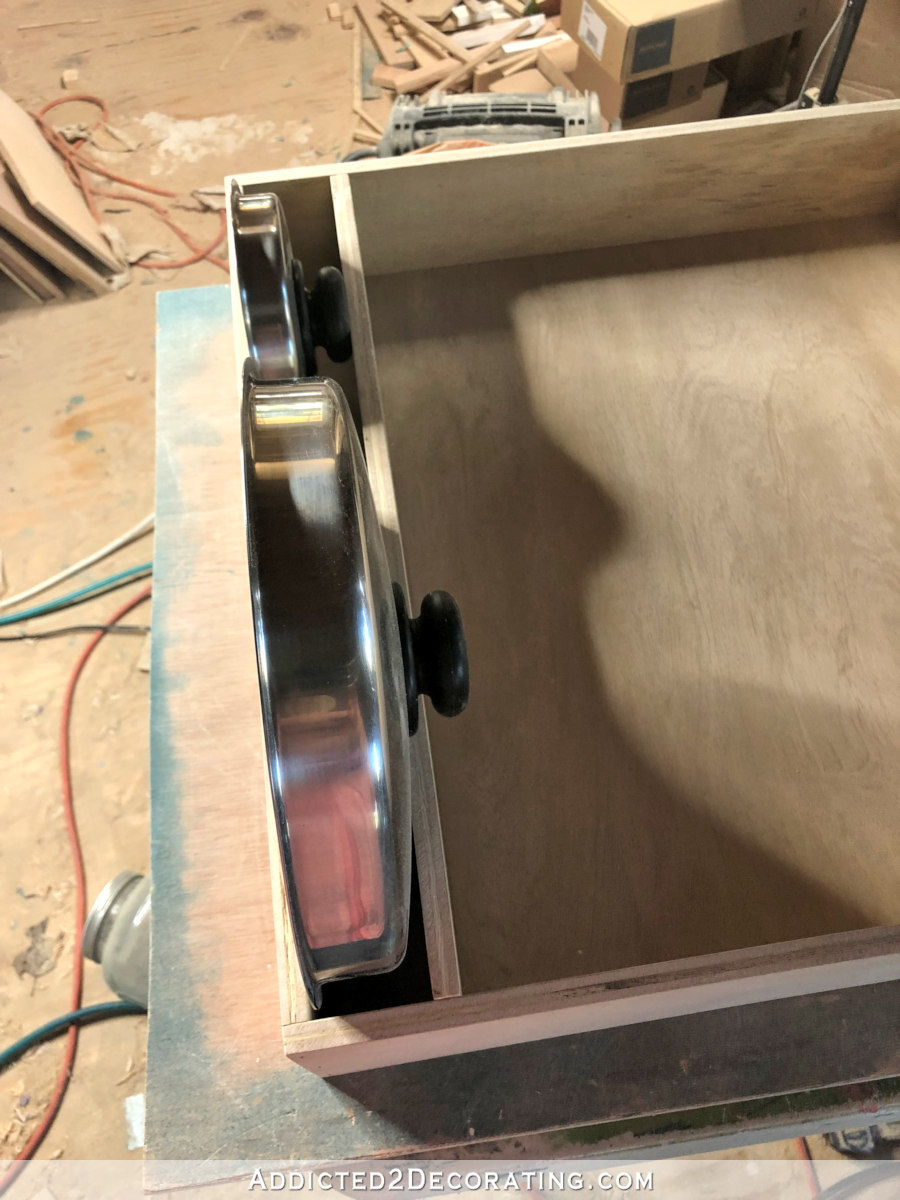
So after putting in the underside drawer slides and taking the measurements I wanted for the underside shelf, I reduce the a chunk of 1/2-inch plywood for the shelf backside. Then I positioned my 4 items of cookware on the plywood to see how I’d prepare them…
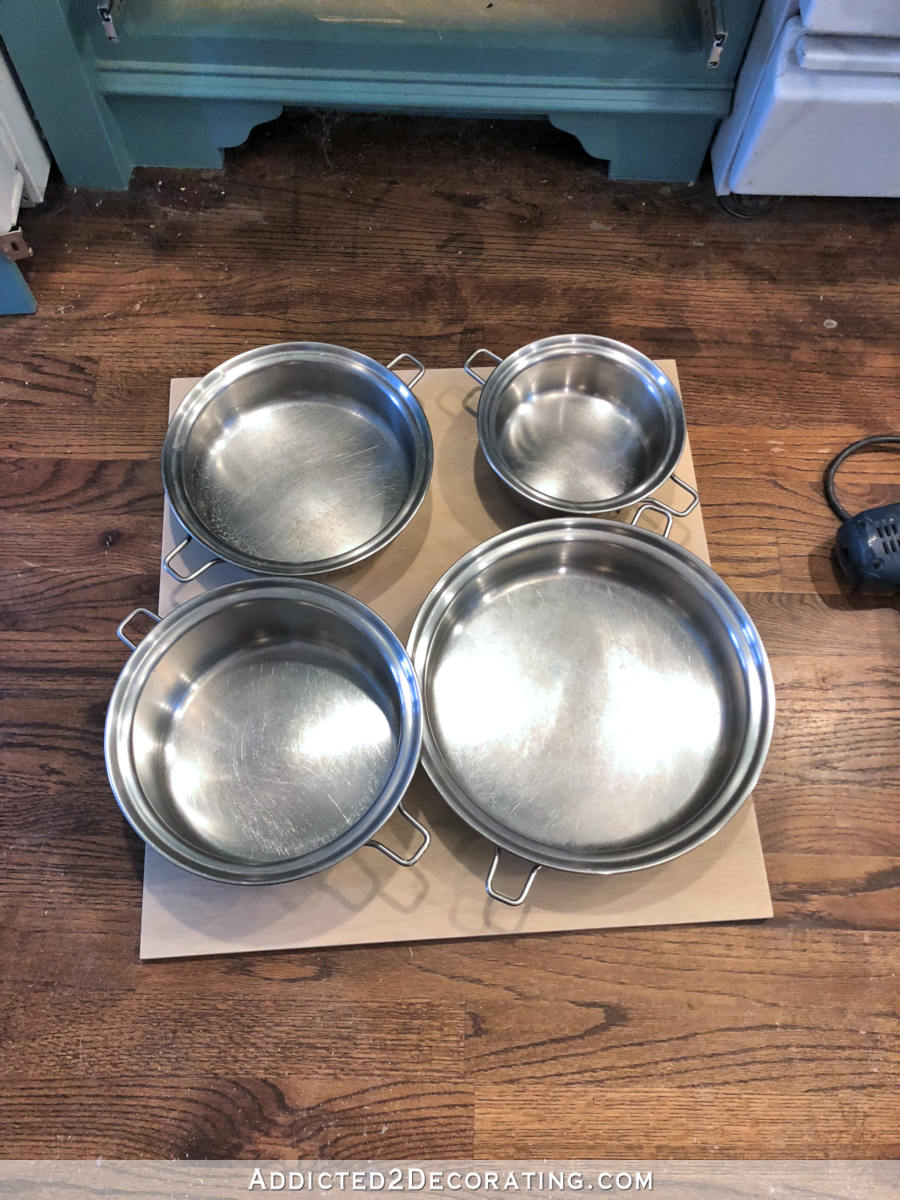
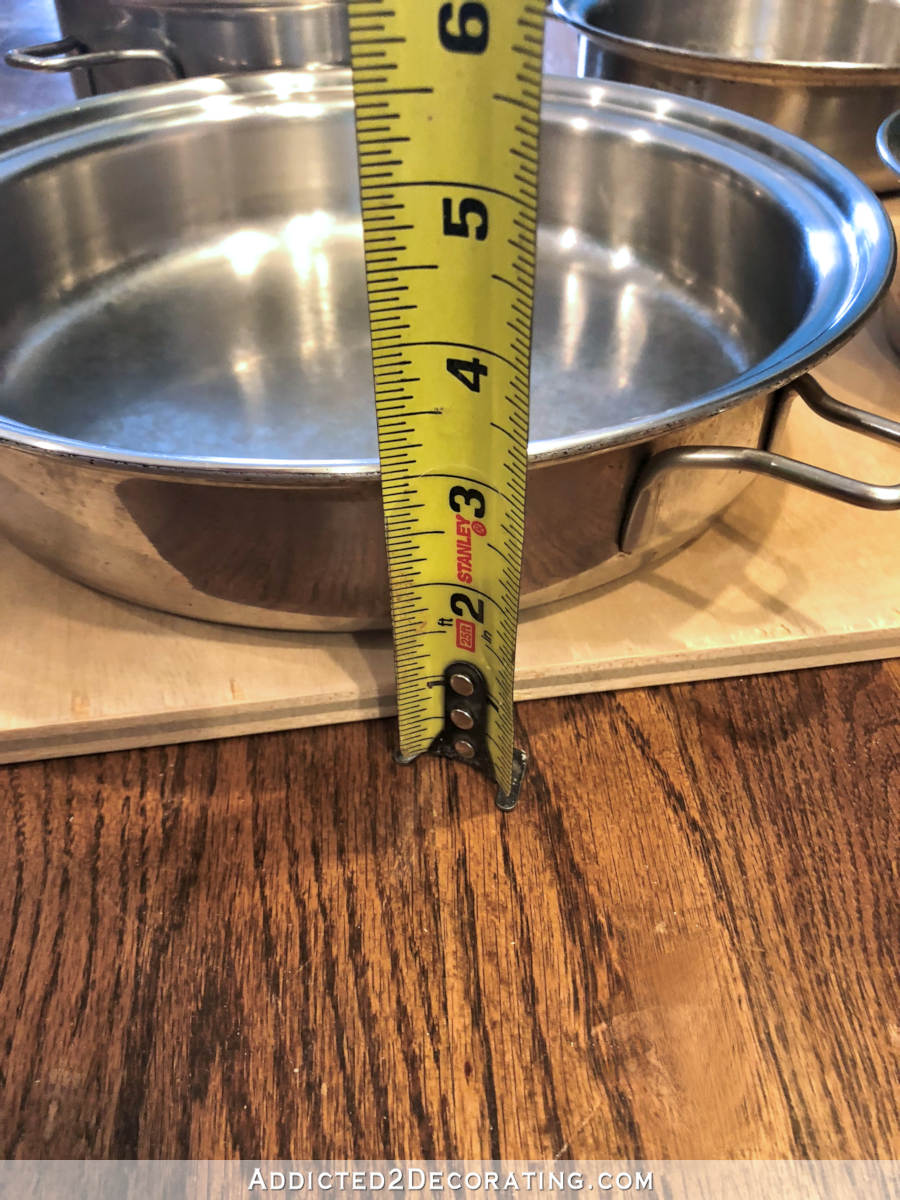
After which I measured how excessive the shelf sides wanted to be to permit sufficient clearance for all 4 items to suit on the shelf. The three small items match contained in the footprint of the drawer simply high-quality, however the high lip on the most important piece went over the sting only a bit, so I knew that the drawer sides needed to be decrease than the lip on that greatest piece.
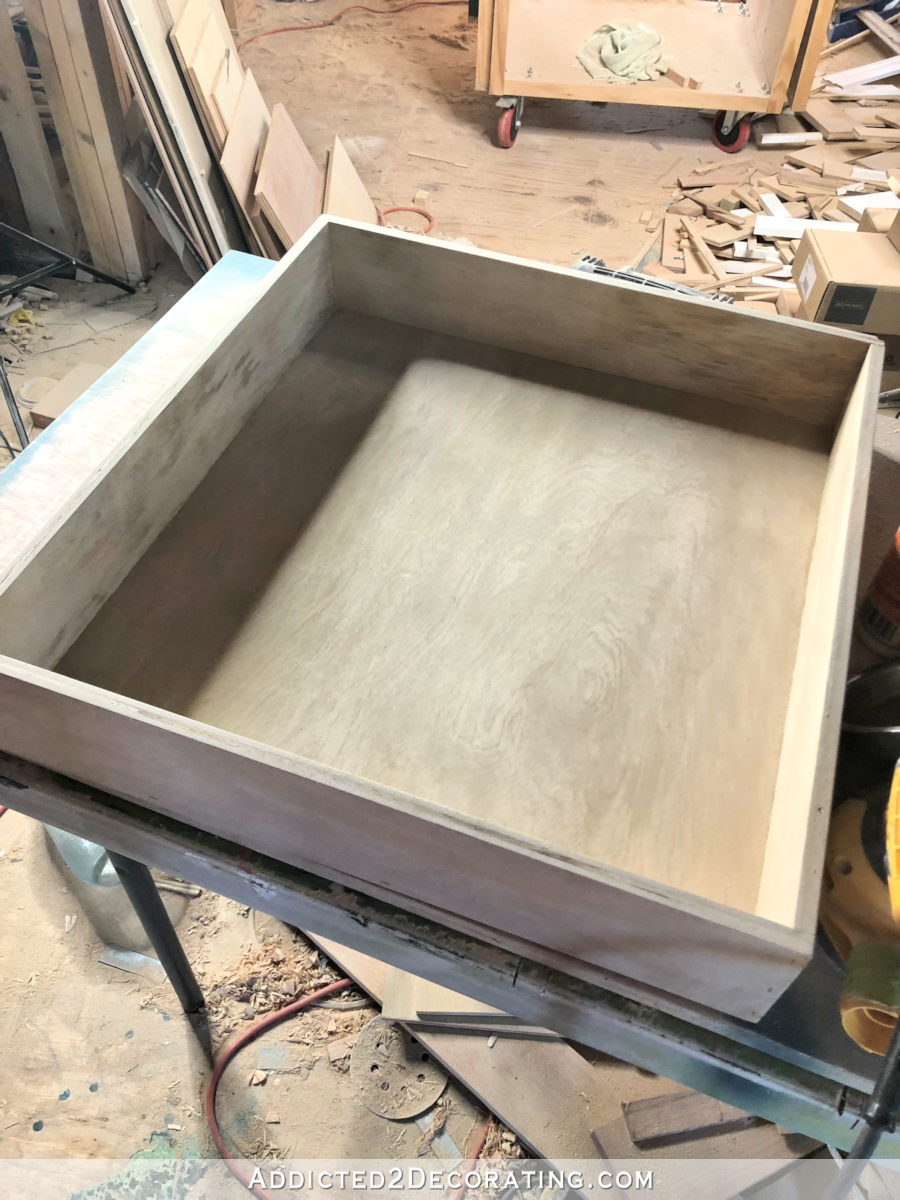
3. Reduce and connect plywood to edges of backside to create sides of shelf.
I settled on 2.5 inches for the peak of the perimeters, and construct a really primary field. I didn’t take photos of this course of since I’ve executed this (and proven y’all) a lot these days, however you simply reduce your backside piece, after which connect the aspect items to the sting of the underside piece (and to one another) utilizing 3/4-inch slender crown staples and wooden glue. I don’t use fancy joints the place the aspect items meet. These are simply butt joints glued and stapled to one another. It’s actually really easy.
4. Take away cupboard door and connect to entrance of drawer. (non-obligatory)
This backside drawer required a bit of additional work since I needed to transform the cupboard door from a door to what’s principally a drawer entrance. First, I had to make use of a chunk of 1/4-inch plywood to make the recessed panel space flush with the skin body. I don’t know of any nails or staples that might have labored for this with out going via the face of the cupboard door, so I simply used wooden glue for this.

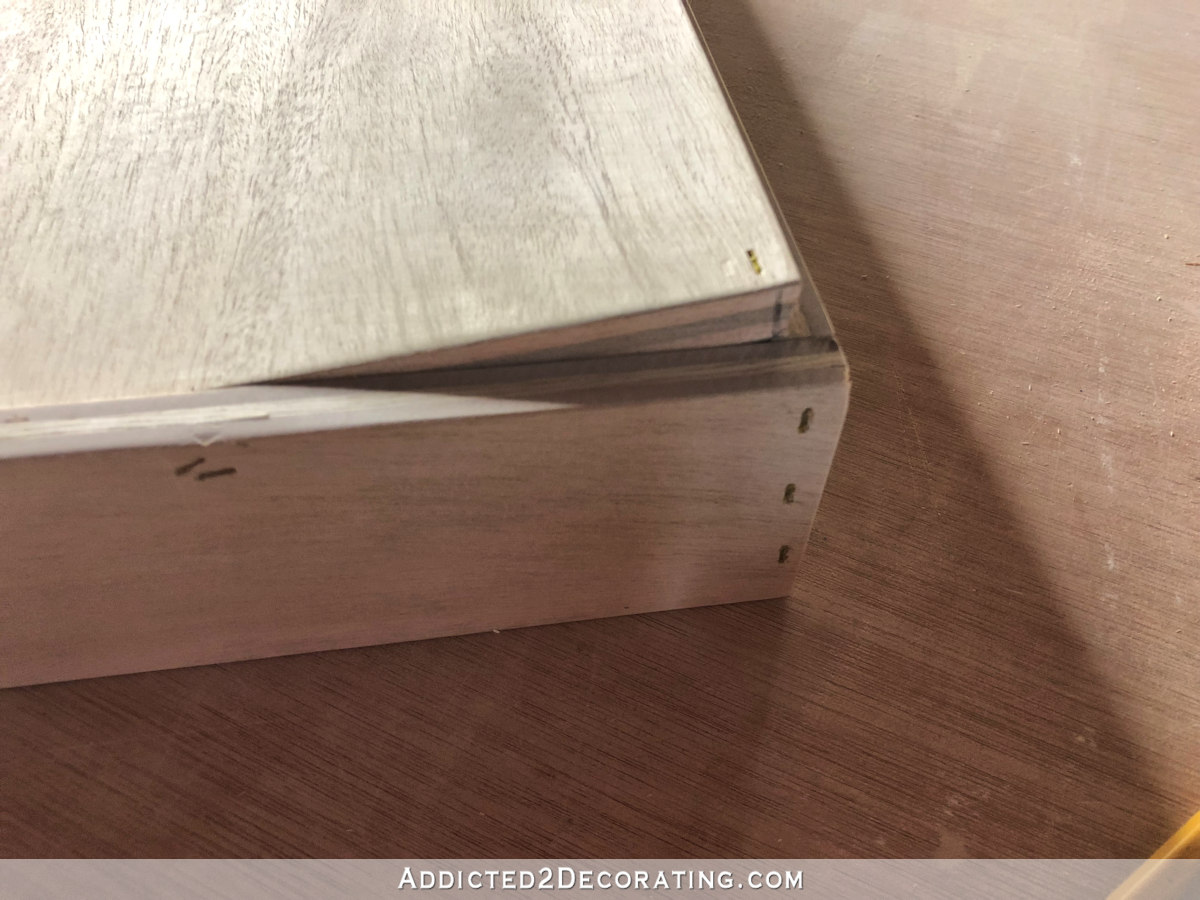
And I forgot to get an image of this, however subsequent I reduce a chunk of three/4-inch plywood to suit the width of the pull-out drawer, however I made it eight inches excessive to cowl all the space that I had lined on the door with the 1/4-inch plywood. I didn’t get an image of the three/4-inch plywood piece, however you’ll be able to see the black strains on the image beneath indicating the world that the three/4-inch plywood lined.
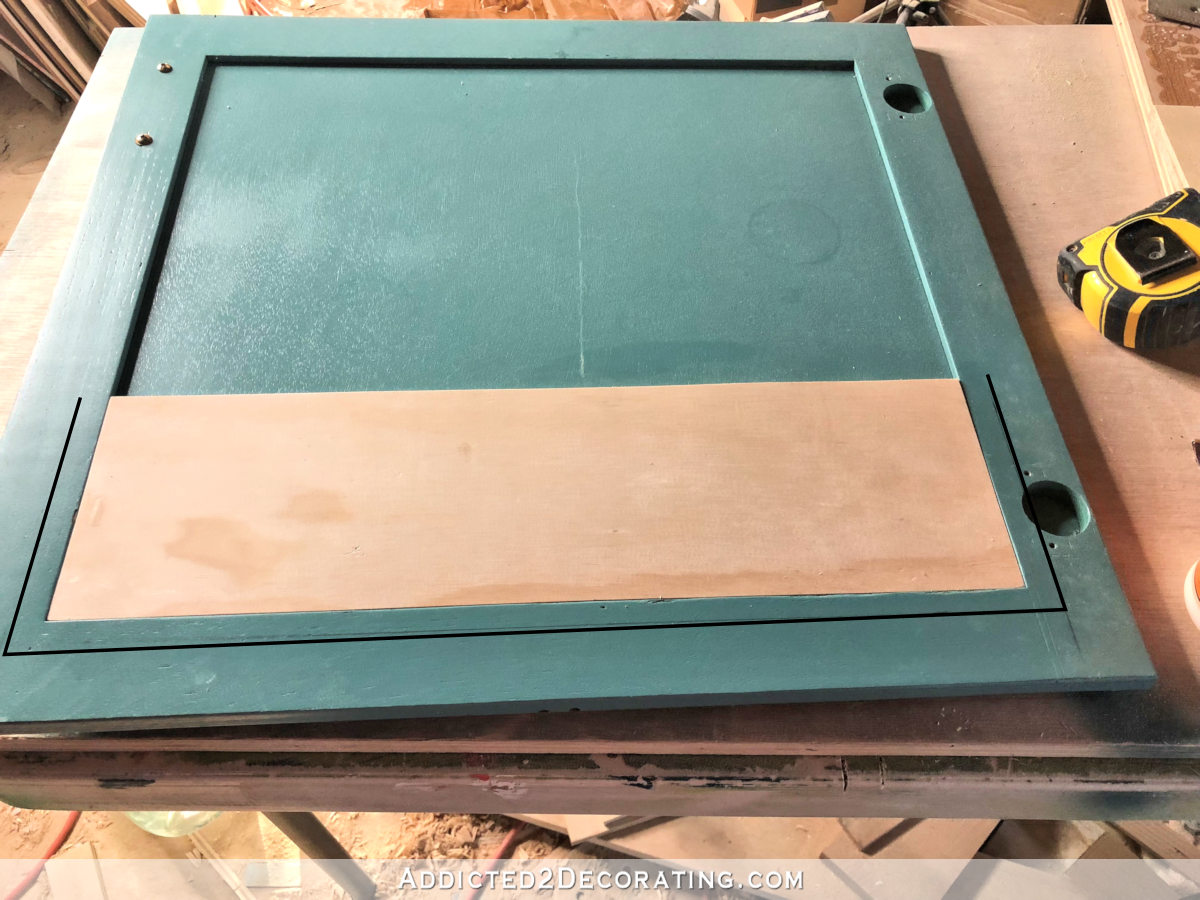
I hooked up that piece of three/4-inch plywood to the entrance of the pull-out shelf first, utilizing nails and wooden glue. After giving it about half-hour for the glue to start out drying, I then put wooden glue on the world throughout the tips I had drawn on the again of the cupboard door, after which positioned the pull-out shelf onto the again of the cupboard door, lined up the plywood with the information strains I had drawn, and secured them collectively utilizing 1.25-inch 16-gauge nails across the aspect edges.
Word that I solely put nails the place they might undergo the plywood and into the body of the door, ensuring that I didn’t put any nails via the skinny recessed panel on the door.
5. Set up drawer slides on the aspect of the drawer and set up.
After setting it apart for about an hour and letting the glue dry sufficient to carry (a couple of hours would have been preferable, however I’m impatient 😀 ), I hooked up the drawer slides to the perimeters of the shelf, put in the shelf within the cupboard, and added the pots and pans to check out the way it labored.
It labored completely! And with that in place, I may then measure for placement of the subsequent (center) shelf.
DIY pull-out shelf for cookware lids and handles
For the center shelf, I constructed the essential shelf precisely as I outlined above (except attaching the shelf field to the cupboard door, clearly).
However for this DIY pull-out shelf, I needed to customise it a bit to carry the lids. So after the essential drawer field was constructed, I reduce two items of plywood to function dividers, after which positioned the lids within the drawer and decided the location of the primary divider.
With the location decided, I measured how large that area wanted to be and reduce two items of plywood to make use of as spacers…
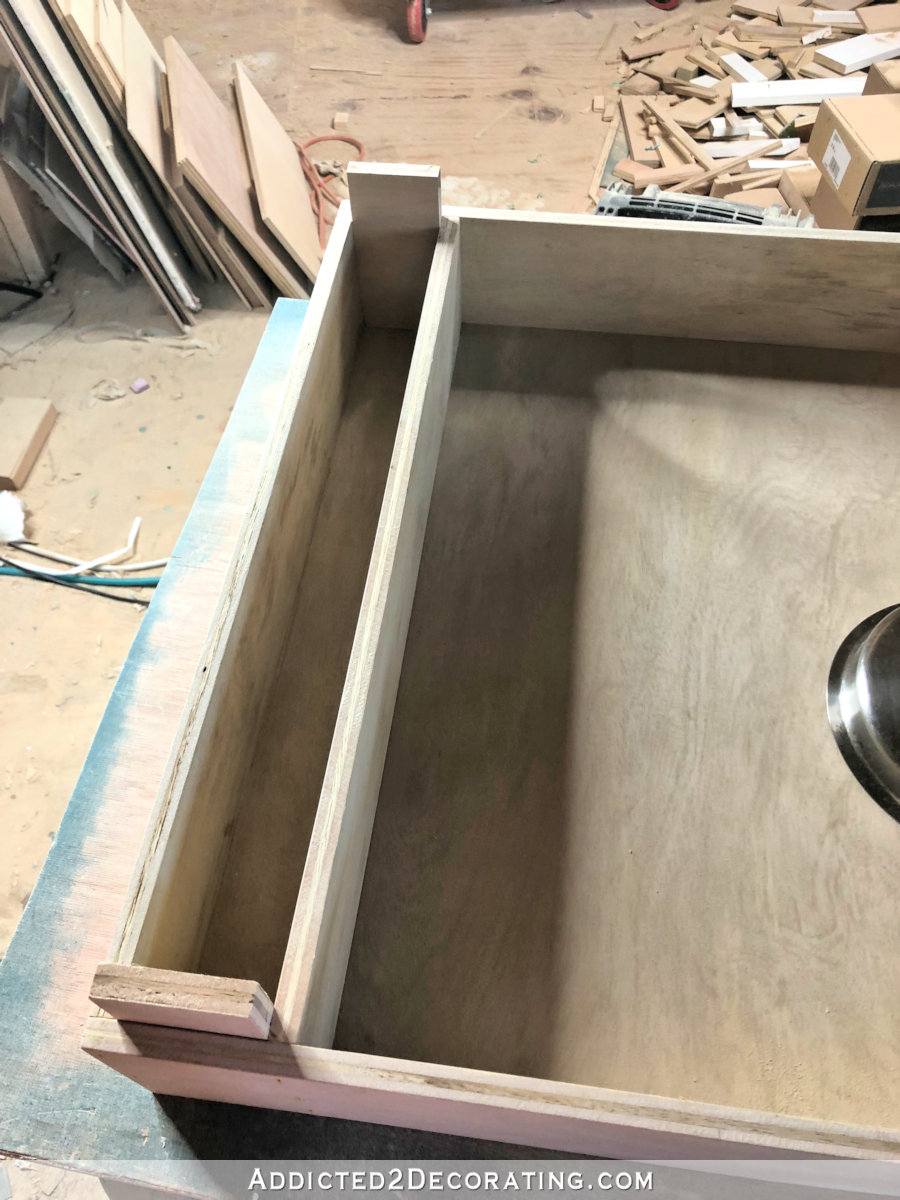
After which I stapled that divider into place, stapling straight via the back and front sides of the drawer field and into the perimeters of the divider.
I repeated that course of with the second divider. It wasn’t till I believed the drawer field was completed and I had hooked up the drawer slides to the perimeters, inserted it into the cupboard, and loaded it with the lids and handles, that I made a decision I didn’t really want such a giant part for only for handles. So I made a decision so as to add yet one more divider and use the additional area to retailer my steamer insert. It was a bit more difficult so as to add that divider at that time, however I managed.
So right here’s how that second drawer turned out…
That’s actually all that I had deliberate for that cupboard, however I had just a bit little bit of area left on the high that I hated to waste. At first I thought of simply making a shallow drawer for odds and ends, however then I remembered a remark from somebody who used to have their measuring cups and spoons hanging on the within of an higher cupboard door.
I had been planning on that very same design for my higher cupboard, however that commenter stated that she favored having them saved that manner, however the clanging and banging noises would scare her if she opened the door too quick. I hadn’t even considered that, and the concept of listening to these noises each time I open a cupboard door didn’t actually enchantment to me.
So I made a decision to make the most of that high shallow area in an analogous manner with every cup and spoon by itself cup hook and neatly labeled, however I’d solely be pulling this out after I particularly wanted a measuring cup or spoon. And bonus…no clanging noise!
DIY pull-out angled shelf for measuring cups and spoons
To make this personalized DIY pull-out shelf, I put in the drawer slides and measured for the drawer width identical to I all the time do.
However as a substitute of beginning this drawer field by reducing the underside after which attaching the perimeters to the perimeters of the underside piece, as a substitute I reduce the perimeters and stapled these collectively. Then I reduce the piece for the underside, however I reduce it in order that it was the right width, however the size was a bit too lengthy. This allowed it to sit down at an angle, with the again edge sitting on high of the aspect body.
Then I added small cup hooks and labels so that every cup and spoon has an assigned spot. And since this pull-out shelf is so near the highest of the cupboard body, I additionally added a small wooden knob on the entrance to make it simpler to drag out.
I’m so excited to lastly have this personalized pots and pans group in my kitchen! I went from extremely disorganized to feeling type of fancy with my {custom} DIY pull-out cabinets. 😀 So right here’s one other have a look at them.
Right here’s the decrease DIY pull-out shelf (hooked up to the drawer entrance that simply opens with the pull of the cupboard deal with) with my 4 most-used items of cookware…
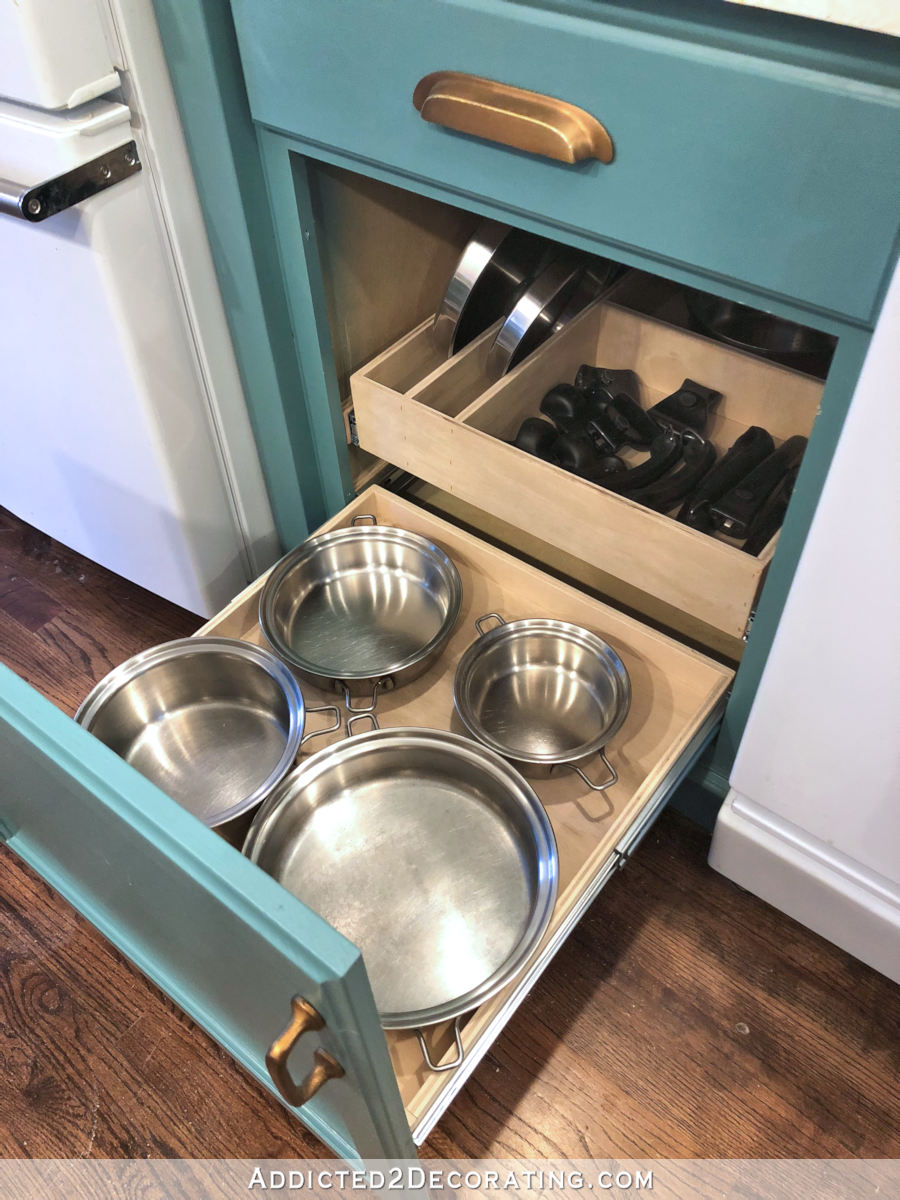
After which the center DIY pull-out shelf with the lids, handles, and steamer insert…
And a DIY pull-out shelf personalized only for my very own sanity with a labeled spot for every of my measuring cups and spoons…
Now I do know a few of you might be questioning, “Is that each one the cookware you’ve?” No, it’s not. The cupboard to the appropriate of the range will home my 4 skillets and their lids.
I even have an electrical skillet, an electrical pot (much like a crock pot…kinda), a seven-quart pot, and an eight-quart pot, all of which had been a part of my Saladmaster cookware set. Since I don’t use these items every day, they’ll all discover properties within the pantry. My purpose was to only maintain the cookware that I take advantage of every day within the kitchen cupboards and remove muddle and enhance effectivity by shifting the remainder to the pantry.
This complete group factor is addictive. I’m lastly understanding why there are complete blogs devoted to the subject. 😀
Useful sources and merchandise:
Need to flip a drawer into an incredible spice rack? Right here’s a peek at mine…
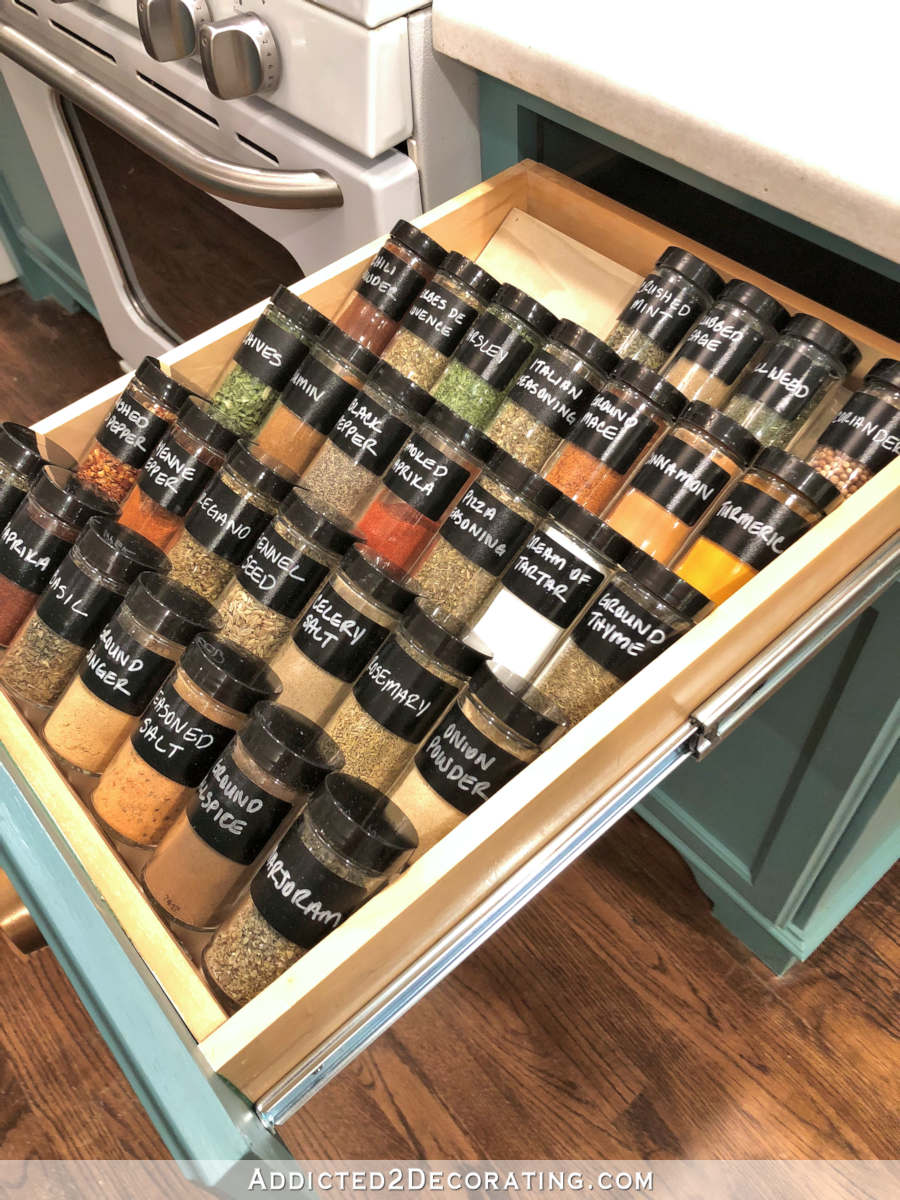
I share the main points on that mission right here…
I additionally constructed a {custom} DIY pull-out slotted drawer for my bakeware. Right here’s how that turned out…
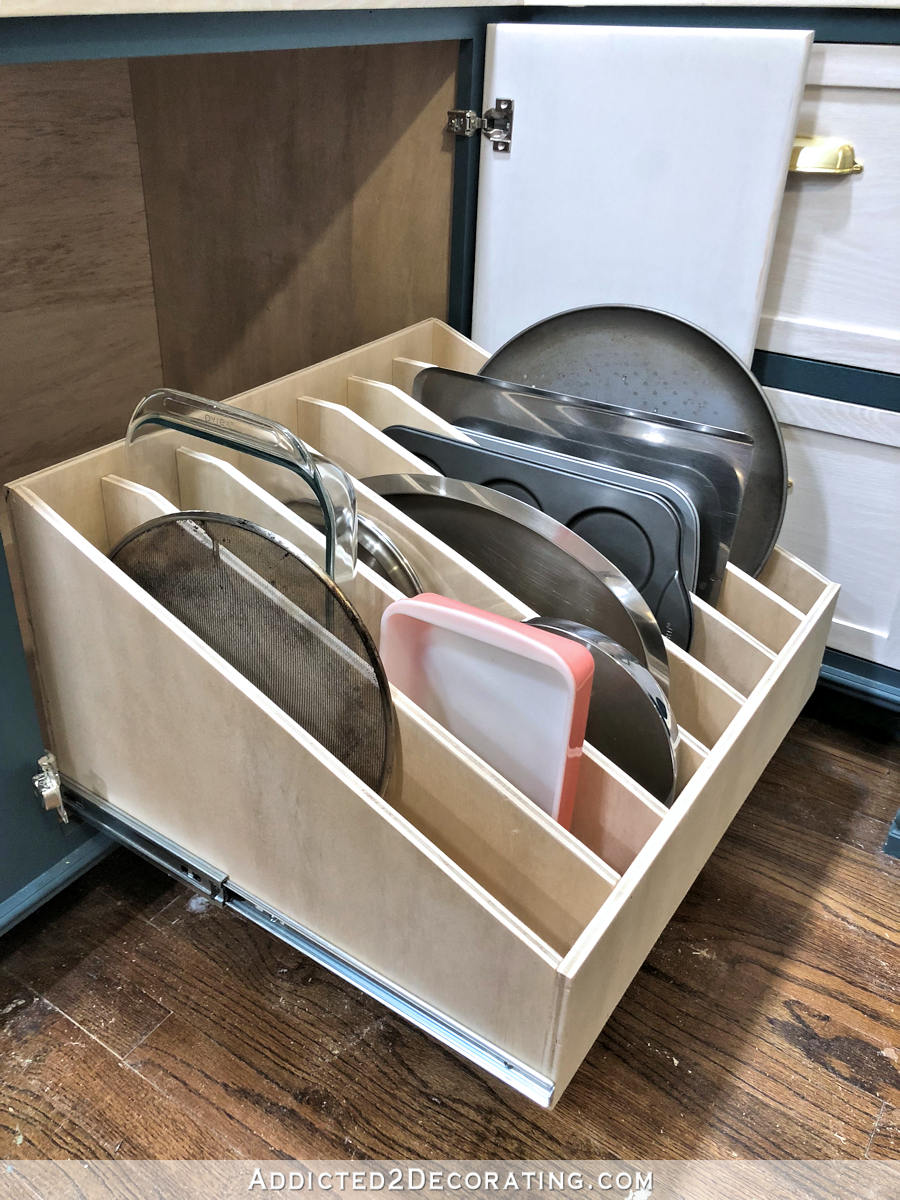
You possibly can see the main points of that mission right here…

Addicted 2 Adorning is the place I share my DIY and adorning journey as I transform and beautify the 1948 fixer higher that my husband, Matt, and I purchased in 2013. Matt has M.S. and is unable to do bodily work, so I do the vast majority of the work on the home on my own. You can learn more about me here.


